“If character is the foreground of fiction, setting is the background,” the narrator of Writing Fiction tells us. But how do you create engaging settings that enhance your story? And how can the popular writing software, Scrivener, help you create setting sketches perfect for particular your story?
Illustration by Guy Moll (creative commons). Modified by The Write Practice.
People (and characters) are a product of their environment, for good or for ill. In order to write compelling stories that draw readers in, you have to not only know your setting intimately, but be able to manipulate that setting to bring out the best and worst in your characters.
A good setting can take on personality traits of its own, and some tend to think of a setting as another character in the story.
However, all settings have to start somewhere. In this post, we’ll go over a classic method to help you flesh out your settings early in the process so that they can become a vital part of your story.
What Is a Setting Sketch?
A setting sketch is an outline of a fictional place. What it looks like, smells like, feels like. You can discuss a setting objectively, as an author, through the lens of your own experiences, or you can take the same setting and examine it through the eyes of a character.
Settings also create an atmosphere and tone of your story. Horror stories are great examples of setting because they create an atmosphere of fear that is almost palpable; it’s what makes them, in their own unique way, such gripping stories, whether you’re working with a haunted house, a zombie apocalypse, or a ruined castle.
As with character sketches, I like to start with visuals using Scrivener’s cork board interface.
Character or Setting Sketch—Which Comes First?
Last week, we talked about how character sketches can help you flesh out the characters in your story, and this week we’re going to continue the discussion by talking about how setting sketches can help you craft a unique and compelling setting.
You might be wondering which should you work on first, your character sketches or your setting sketches?
Both character and setting sketches are fundamental to the planning phase of the creative writing process, but the order in which you tackle them is really up to you.
I’m of the mindset that you can do setting, character, or plot (which we’ll talk about next week) in any order that makes the most sense to you. Play to your own strengths.
One of the points I’ll be emphasizing as we go through this series is that you should develop your own process, and adjust these tactics and tools to fit your style.
Using Template Sheets in Scrivener for Setting Sketches
 We went over how to use template sheets in Scrivener last week for character sketches. Using template sheets for setting sketches is exactly the same. In fact, you can put as many template sheets as you want in Scrivener, so if you need multiple setting sketches to look at a particlar setting from the points of view of each character, the world is your oyster.
Sidenote: I reference Scrivener’s features and include screenshots of the software, but you can still use these methods without Scrivener. Simply create a separate text file for each character and keep them in a folder named “My Story – Character Sketches.” If you’re interested in Scrivener, Joe reviewed it here.
Visualize Your Setting
Start with a notecard for each setting in your story. If the whole story takes place in one room in one house, you might only have a single card. More likely though, your story takes place in multiple settings.
Try to be as specific as possible with your locations. Instead of “New York City,” name your card “The Village” or, even better, “Artichoke Pizza in the Village.” The more specific your setting, the more likely it is to come to life.
Once you have all your setting notecards set up, go out and find a single image that feels like your setting. There can be discrepancies between what you see in the photo you choose, and the actual setting in your story. The idea isn’t to find a photo that represents your story in every way possible, but to capture the spirit of that particular location so that you have a place to start your sketch.
(Again, I explain how to get photos onto the notecards in Scrivener in the previous article on character sketches.)
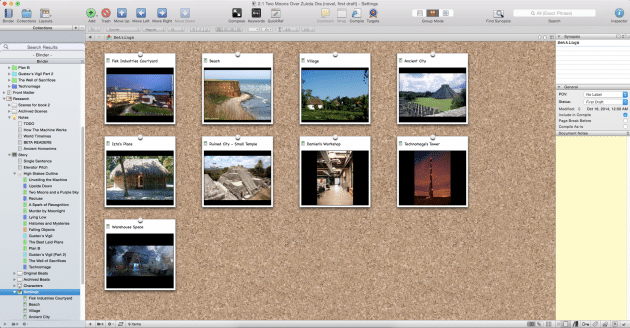
If you find it necessary to use more than one photo, you can add more inside the Scrivenings view of a particular setting, where you’ll be doing the sketch itself.
Write About Your Setting
Now for the fun part: open up a setting and start writing.
Here’s a screenshot of what the default template sheet for a setting sketch looks like in Scrivener. I’ve filled it out with one of the settings in my novel: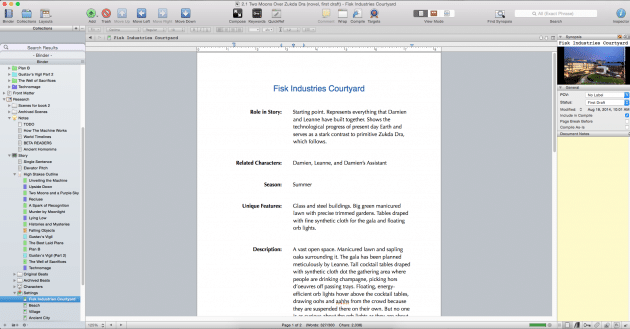
Aim for 500+ words. Any more than that, I find, is icing on the cake. But any less than that and you may find yourself coming back to the sketch to flesh it out more as you write. That’s okay. Better to have it and not need it than the other way around.
An Alternate Setting Sketch Template
Here’s an alternate setting sketch template you may use in your writing practice. This is my preferred setting sketch, and I keep it in a separate template file I created for any future novel or short story I create.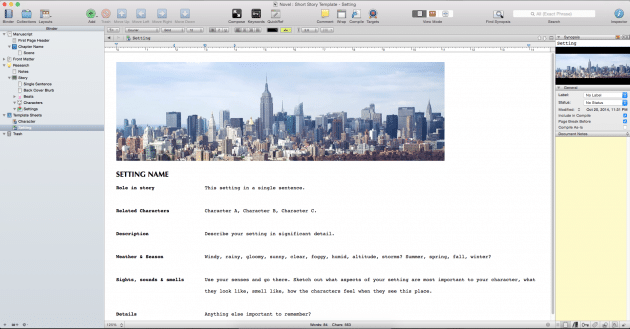
What I like about this version, compared to Scrivener’s default, is that it’s less prescriptive and more free form. It leaves room for the imagination to run wild, cuing you with suggestions rather than specific questions. For example, you see in the default sketch above, the label “season”? All I wrote there was “summer.” That wasn’t important to my story, so it was really just a waste of a label. In my sketch below, I’ve combined “Weather & Seasons,” as I find that there is a lot of information to mine with both those categories, whereas a season alone isn’t very significant in the stories I want to tell.
Maybe this will change over time. You have two options here, so mix and match until you find what works for you.
Setting Sketch Checklist
How do you know when you’re setting sketch is done? Again (the nail is in, stop hammering!), that depends on your own unique process. You’re done when you think you can squeeze any more juice out of the setting you’re working on.
Just in case you’re still not sure, here’s a checklist you can run through that may help you out. Consider each of your setting sketches and ask yourself:
- What unique atmosphere does this setting evoke?
- What important role does this setting play in the story?
- Would my story be the same if I changed this setting? Why or why not?
- Go through the weather patterns: rain, wind, snow, hot, cold, humid—what about this setting is consistent in each type of weather? What about this setting is inconsistent?
- What year is it in this setting? Why does that matter?
- How has this setting influences each of your characters?
What do you think about this method of setting sketches? How would you do things differently? Share your tricks of the trade in the comments section.
PRACTICE
Here are five writing prompts to help you develop settings for your next story.
- Make a list of settings in the story you’re working on. Give all of your settings unique and interesting names.
- Find photos on the internet, and drag them into scrivener (or add them to your Word Doc).
- Spin a globe—wherever your finger lands, sketch that place. You’re not allowed to search google first. Use only what you already know and what the name summons to your imagination. When you’re done, search Google and compare it to the research about the actual place. What’s the same? What’s different?
- Pick a destination you’ve traveled to (even if it’s only across town). Sketch that place from memory.
- Write about all the extremes of climate: the arctic, the sahara desert, a tropical rainforest, the surface of the moon.
- BONUS: Describe your settings from the points of view of all of your characters, in two to three sentences for each one.
Use what works, throw out anything that doesn’t.
Using one of the practice prompts above, write, sketch, or find for fifteen minutes. When your time is up, share what you have so far in the comments section.
Happy sketching!
[wp_ad_camp_5]
Matt Herron is the author of Scrivener Superpowers: How to Use Cutting-Edge Software to Energize Your Creative Writing Practice. He has a degree in English Literature, a dog named Elsa, and an adrenaline addiction sated by rock climbing and travel. The best way to get in touch with him is on Twitter @mgherron.


Pitts, a town in the South
Role in Story: Emma’s home
Related Characters: Emma, Sam, Mrs. Bumgarner, Leonie Gerhardt, and 423 other inhabitants
Season: Summer. Stinking hot, steamy, dusty, sticky.
Unique Features: a water tower with a goat on it (for no apparent reason); a ratio of 2/3 potholes to asphalt; Christmas lights in July; unspeakable public bathrooms that often contain dead fish; a hangout spot where old-timers play checkers and drink Pepsi; every house has a front porch and tricycles in the front yard, and maybe a couch or gas stove as well
Description: A tiny rural town that thinks a lot of itself and is never thought of by others, Pitts in the place everyone wants to get out of. Or at least anyone who dreams of anything greater than working at a chicken processing plant. Emma lives on the nicer side of town, the side where people have vinyl siding and large dog pens and no beer cans in the driveway. She sneers at the other side, the one with collapsing roofs and messy evictions spaced at regular intervals. Nevertheless, there’s a charm to this town that she eventually realizes. Everyone knows each other, and you can’t walk down the street without someone waving. If you’re in need, there are plenty of neighbors who can help you out. The crime rate is low, traffic jams nonexistent, and there’s a sense of reality to life that you miss in the world of chic boutiques and unnecessary flowers and fountains. Life is stripped down to the bare essentials here, and in a place where an “evening out” means a dog race followed by a demolition derby it is easier to see the important things in life. Family. Faith. Good food. Still, Emma isn’t altogether certain if that balances out the petty politics and lack of a gas station.
Sights: Wide streets lined with empty buildings that used to be thriving businesses; pickup trucks; shirtless old men; yard sales
Sounds: The rumble of semi trucks on the highway; cicadas buzzing in the dry grass; frogs chirping down by the lake; people talking in a lazy, measured drawl
Smells: The smell of barbecue on a summer evening; sulfur in the town water supply
Notes: When people say “This is the pits,” they mean Pitts.
I love this town already! Definitely unique but very real. These details will really come to life on the page. Just out of curiosity, what state is it in?
Well thank you! I was going to say it is in Arkansas, but there is actually a Pitts, Arkansas….
That happened to me too. The setting of my WIP is Oak Ridge, New Jersey. Googled it and found out it actually exists. Oh well
Excellent setting. I can see, hear, and smell this town. I like the way you mixed concrete observations (tricycles in the yard) with subjective observation (a small town that that thinks a lot of itself, and is never thought of by others). I’d love to hear what happens in Pitts.
Great descriptions. The town sounds like “the pits.” 🙂
I don’t know if you ever lived in such a place, but if you haven’t you have a great imagination. This should be of great use as you write the story.
Adelaide
THANK YOU for the push to put together templates. I have a habit of working in a blank project, which meant I didn’t have access to even the default templates. I was just throwing things into my character profiles, wishing they were better organized. Now I can duplicate precise organization with ease!
Awesome, glad it was helpful!
Setting: A remote region of the high desert mountains
Lorelei used to say the mountains are like stained glass, their sandy, wheat-colored slopes assuming a range of hues as the sun and clouds make their daily and seasonal cycles. Jewel tones of purple and blue fade to velvety chocolate brown, then light up in glowing ambers and bright reds.
Sasha said the mountains are like the waves that roll in and out of the beach near her hometown on the California coast. Land rises and falls just like the tides, though at a greatly protracted and gradual speed. She would point to the sharp peaks and rounded summits and describe them as freeze frames of brown, rocky waves crashing across the desert, one inch every million years.
Tonias always called these mountains “prehistoric”. Raised in luxury and accustomed to easy living, he saw only bleak desolation; a raw lunar aspect to the bare, exposed high country.
Donnie sees a group gathered together, leaning into and supporting each other. Driving up the winding dirt road, catching a different view of every curve and angle of the land mass, she sees heads, shoulders, profiles, backs, seated and lying figures. When she must take a trip down to the valley, she feels torn out; as if amputated from a live organism. Though anxious to return, she drives up the road carefully, not fast. Like a small child wriggling her way into a distracted group of adults, she carefully twists and slides past the bulk of the big ones, until she is safely nestled in the center of the huddle.
I love this! There is so much living imagery here. I especially like the way you showed the same terrain from different characters’ viewpoints.
Thanks Abigail!
Beautiful! I wish I could write as well.
Rebel, that is generous praise. Thank you!
That was very nice 🙂 love the word choice
Logan, I spent most of my time struggling with word choice! Thank you for mentioning that it sounds good!
Well done. Very descriptive images.
Adelaide
Thanks!
Thought I’ve never used Scrivener, it sounds like something I’d like to try. The following is something I wrote where the setting is in West Texas.
Sunlight glinting off a passing car distracted her and drew her to the window. Had Boyd forgotten something and returned? He hadn’t bother kissing her good-bye before he left. It seems he’d stopped doing that years ago. She didn’t even know if he wore aftershave anymore. She’d forgotten what he smelled like.
No, it wasn’t him. Just the neighbor across the street, a young blonde woman with the curves of youth, unloading groceries and a baby from a car seat. She didn’t even know the woman’s name and wouldn’t recognize her if she ran into her at the store. The neighborhood had changed in the past twenty years. All the old familiar faces, those whose children had played with her son when he was small, had died or moved away. It was now an area of starter homes for young businessmen and their growing
families. She and Boyd, once a young couple on the street, were now the old
folks no one paid any attention to.
She heard birds chirping and the patter of squirrels’ feet running across her roof. They sounded happy. She sighed and stared at her front yard, at the yellow spots of dying grass due to either a fungus or grub worms. Who knew which? It was amazing the sycamore trees and boxwood shrubs still lived in this part of drought-stricken West Texas. When you drove into town you were greeted by sand dunes and plastic grocery bags clinging to scraggly mesquite trees, and the smell of crude oil and sewage. The clutter in her house, her dying grass, and the drought all seemed to mirror her life. She
was shriveling up into a huge mess.
You have captured this depressed area very well. I can really see the neighborhood.
Adelaide
This is good. Your description of the setting deftly shows us a depressed town during the drought, and a depressed narrator whose marriage is an emotional drought.
Matt – I officially love you. I’m learning so much from your Scrivener posts and appreciate you so much.
Wow, thanks Marcy! Im so glad this is helpful to people 🙂 Do share if there’s anything else you’d like me to write about with regards to Scrivener, I’d love to know what else would be helpful to you.
I think you’re 100% on the right track: doing posts over the various section of Scrivener. Many of WANT to use Scrivener, but do not understand ANY of Scrivener.
Right on! I’ll try to think of a couple more specific areas to write about that are up my alley 🙂 Of course you’re always welcome to contact me directly (mgherron.com or @mgherron on twitter) if you have any questions about a particular function of Scrivener!
Thanks, Matt. My husband and I are coming to Austin Nov. 7-9 to watch UT play. Hook ’em!
This sketch is from memory of a trip taken 40 years ago.
We drove into Granada around four in the afternoon, dusty, hot and tired and stopped at the first hotel we saw in the center of town. It was a four story stucco building in a deep shade of ochre with balconies on each floor, a red tiled roof and a profusion of bougainvillea and geraniums in the front garden.
Blessed coolness greeted us in the lobby, not from air conditioning, but from large wooden paddle fans. Somewhere there was the tinkle of glass–a bar we thought–and planned to settle in with a cool drink as soon as we had a room.
A double room suite was available for the five of us, and up we were escorted in the creaky wire-cage elevator to the fifth floor. More paddle fans rotating in the high ceilings
of the suite, a balcony as large as the bedroom, the bathroom as large as the balcony. A small fridge complete with soda for the kids and gin and tonic for us and ice. Ice! Something so simple and available at home but rarely used by the Spaniards.
We mixed drinks, plopped ourselves in the wicker chairs on the balcony and admired the view of church steeples, tile rooftops, gardens, and plazas. This is what we came for.
Adelaide
I like this description of the hotel. It’s an excellent balance of large and very small details, that gives a strong visual and ambience (loved “blessed coolness”), yet is succinct and avoids wordiness.
Thanks, Avril. This was the best trip we ever took. I guess that’s why I remember so many details.
Adelaide
On a cool morning in a small neighborhood, I walk up the concrete steps and through the screened in porch to the front door, my brother and parents behind me. I look toward the ocean, just several blocks away. Sunlight peeks from behind the horizon in pink and purple streaks of light, reflecting off the whispy clouds in the sky.
I smile as I inhale the fresh, salty air. I open the front door and step inside. The cottage we’re renting is quiet in a peaceful way, in some ways like our own home. We all look forward to fishing later on after we’re settled, especially my dad, who’s always loved to fish. He knows about a lot of different types of fish, which ones taste good, which ones don’t taste that good.
The living room walls are covered with shelves, most of them topped with sea shells and starfish; my mom and I admire the photographs of the ocean, sunrises, and local aquatic life. I’m careful not to trip over the huge rug in the center of the room. A modest kitchen and dining room are on the other side of the living room and the room I’ll be staying in is to my right. I share a smile with my bro and parents before heading toward my room.
I squeeze through the doorway with my backpack and suitcase, then set my things on the wooden floor. A picture of a starfish in a light pink frame hangs over the bed. Exhaling, I flop onto the bed against the five or six pillows piled together and shut my eyes, listening to the quiet sound of my brother’s voice as he voices his admiration for the homey feeling of the cottage. With my family members’ gentle voices murmuring in my ears, in moments I drift off to sleep.
—
I had fun writing this. The thing I remember most about this cottage in Port St. Joe in Florida is the gentle feeling of it. It’s like a home away from home. I walk inside, put my things in my room, and lay down for a nap, immediately feeling safe. The cottage is simple, but I have wonderful memories there with my family.
Matt, I’ve read two of your pieces about using Scrivener, this one and the other about developing characters. I’ve enjoyed them both. Thank you. A suggestion. I have Scrivenrer for Mac. I haven’t used it but have stuck with Pages, even though everything I have read makes Scrivener sound like the ultimate writing tool. However, it is complicated and daunting to one such as myself, who is clinging to the ragged edges of computer literacy. Would you write something about your learning process with Scrivener. Did you sit down with a “Scrivener for Dummies” in one hand? Or did you jump in with both feet, figuring out how to handle problems as they cropped up? Anything you could offer a non-techie would be read with deep gratitude. I promise to carefully consider all the comments, also. Thanks.