Storyboarding as it pertains to novels and short stories is the process of mapping out your story, often using index cards, in a high-level way that allows you to see your story visually and rearrange it.
Scrivener’s corkboard view provides the perfect interface to storyboard your novel digitally.
When Should You Storyboard?
The storyboarding process can be undertaken at any phase in the writing of a story. Storyboarding is a tool I use several times during the writing process: before I begin writing (i.e. planning/plotting), during the rough draft (when I get stuck), and when I’m revising. It’s a way to see the big picture, make sure your story has good bones, and that everything logically flows from one scene to the next.
To begin storyboarding, you must at least have an idea for a story. I suggest you also have a few character and setting sketches and a solid grasp of plot and structure. These things will make the storyboarding process easier.
How To Create Your Storyboard in Scrivener
Here are the steps to start storyboarding in Scrivener:
1. To begin, create a new folder.
Move the new folder outside of the Manuscript section in the Binder.
2. View the folder as corkboard
After you create your new storyboarding folder, open it, and view it as a corkboard.
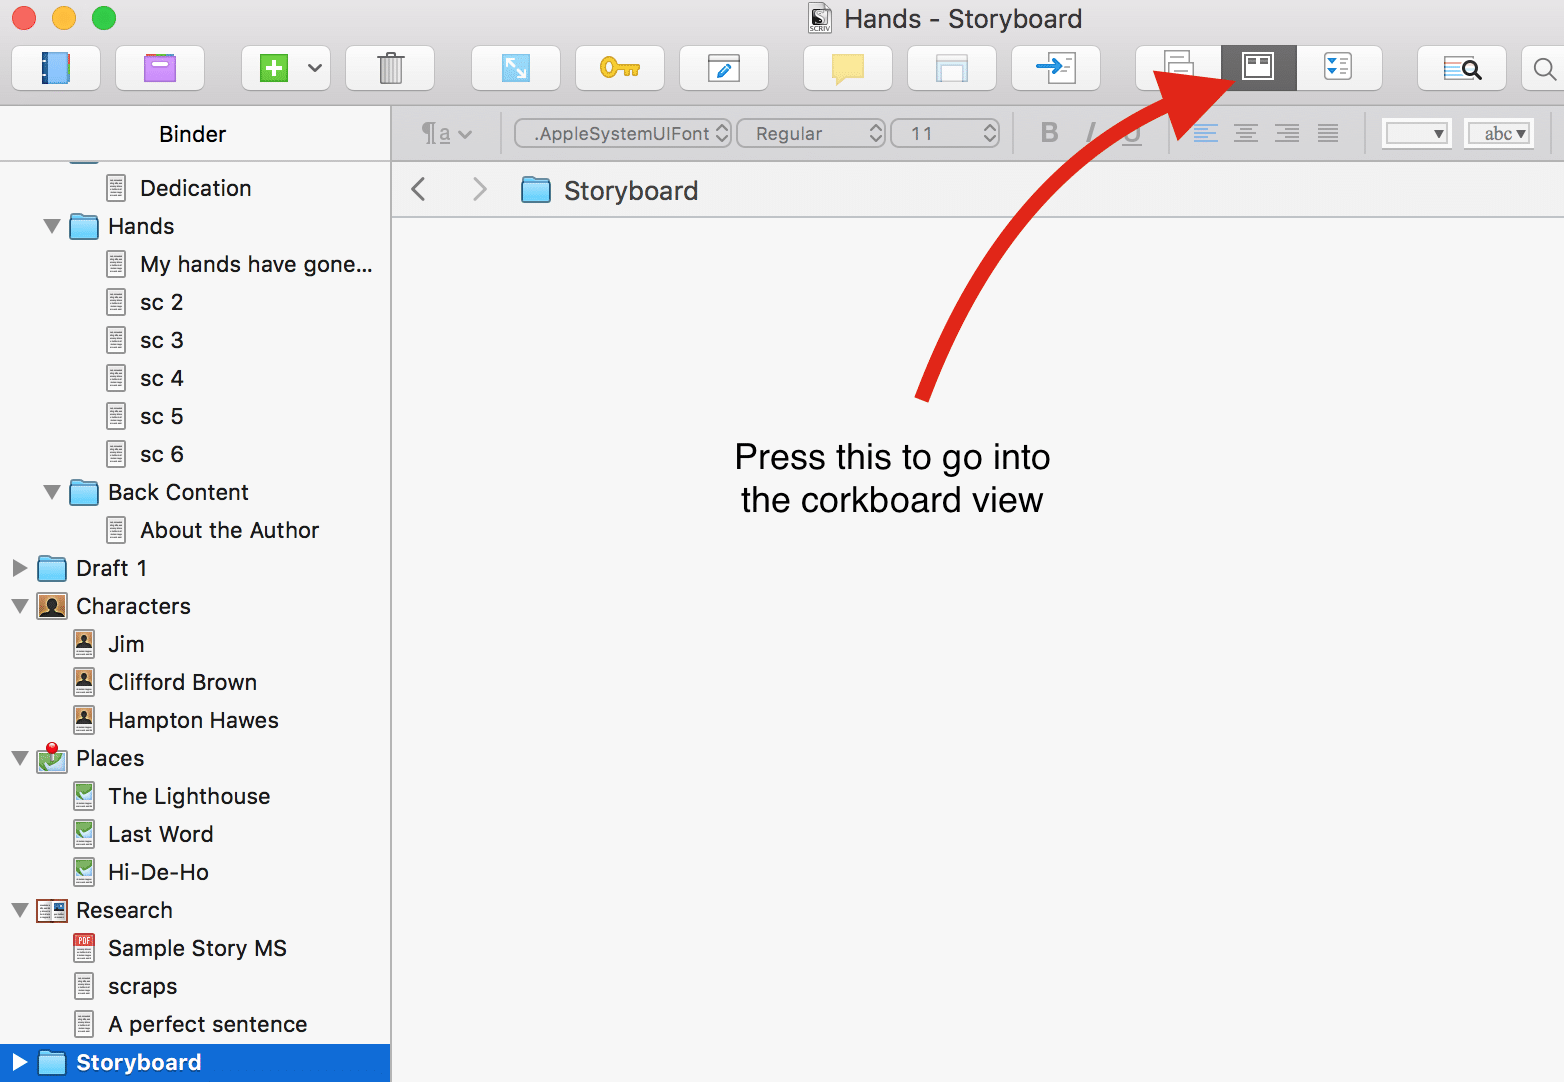
Now you should see an empty corkboard like this (background color/style varies depending on your settings):
3. Create index cards for the major sections of your book
Next, create an index card for your first act or chapter. To do this, just create a new document, as you normally would for a new scene or chapter, within the Storyboard folder. When you switch back to the corkboard view, these documents will automatically become index cards.
I’ll let you start as big as you want. Sometimes, I’ll start planning (especially in the early phases of idea generation), with only three or four cards, one for each “act”. Sometimes I start with a “beginning” card and an “end” card.
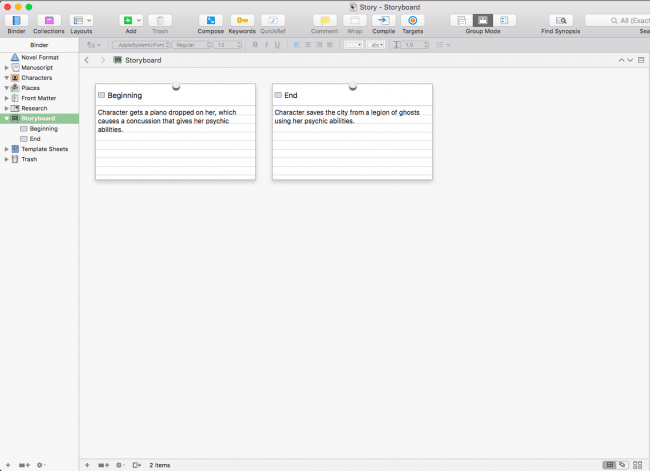
Let’s say you've thought about it for a while and now have a vague idea of how your chapters should be laid out. Great. Create a card and write the title of the chapter at the top of the card.
Even if you don’t plan to title your chapters in the final story, use titles as an exercise in specificity. Maybe you’re writing a literary story and you want those fancy roman numerals to head each chapter, or you don’t want chapter breaks at all, just a blank space between sections like Frank McCourt uses in Angela’s Ashes. That’s fine. Challenge yourself to title your sections anyways.
This isn’t the final result, but an exercise in getting to know your story better.
In the body of the card, write a one or two sentence description of the main purpose of the chapter, like I've done above. The challenge here is to get to the point. Often, I don’t know what the main purpose of my chapter is and I’ll have to think really hard about it. Sometimes I delete the chapter entirely. Other times I break the chapter out into two chapters because there are two important points I want to hit. In both cases, the story is stronger for it.
Once you’re done the first chapter card, create a new index card for the second, third, fourth, etc. until you’ve reached the end of your story. It’s that simple, but unless you’re an experienced storyteller—and perhaps even if you are—it won’t be easy.
Challenge yourself to be as specific as possible.
4. Create index cards for each scene
Once you have your first round of cards is complete, it’s time to start going deeper into your story. If you started with acts, break them down into chapters. If you started with chapters, break them down into scenes.
Scenes are the basic unit of storytelling, so your goal is to get down to the scene level.
If you write those short one-scene chapters like Dan Brown or David Baldacci, you’re in luck: that's as deep as you need to go. But most people don’t write that way. Most writers have multiple scenes within a chapter, so keep breaking them your index cards down until you have a card for each scene.
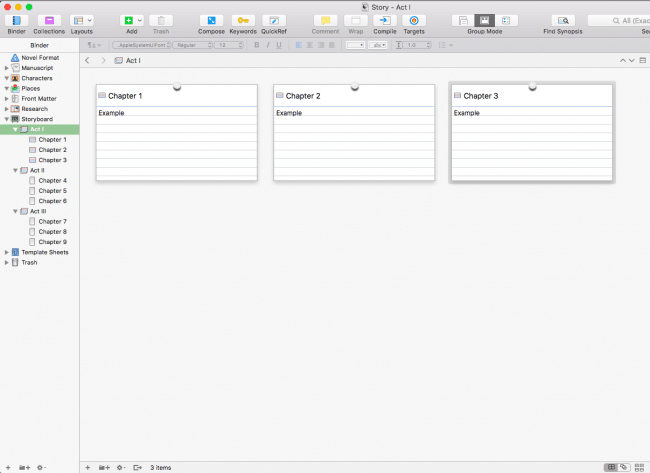
At this point, you might have to make an organizational decision. You can nest your scenes within your chapters (or your chapters within your acts), which will require a lot of hopping up and down levels to view the cards you’ve created across the whole story, but which will show fewer cards on the screen at any given time. Or you can keep them all on one screen. Here’s an example three-act story structure with three chapters in each act, opened to Act I. As you can see, when you've viewing Act I, you're limited to seeing just the chapters within the act.
If you’re writing an epic fantasy novel, I would understand if you wanted to nest your chapters and scenes within larger containers like this. Storyboard one act at a time to make it less overwhelming.
My personal preference is to deal with more overwhelm at this phase. Next, when we transition to a physical medium, you’ll be able to get a big picture view.
5. Print out your storyboard
You would need several screens to get a good birds eye view of your story on the computer. Fortunately, now that you’ve begun to storyboard in Scrivener first, you can transition to a physical version very easily. All you need is a printer and a pair of scissors.
While you’re in the corkboard view, go to File > Print… and print out the digital notecards you’ve created. Scrivener will print these with dotted borders around each card.
Now it’s arts and crafts day in school! Grab a pair of scissors and cut the paper into individual index cards. Then use an actual corkboard with pushpins—or the floor, or a long piece of butcher paper—to lay it all out.
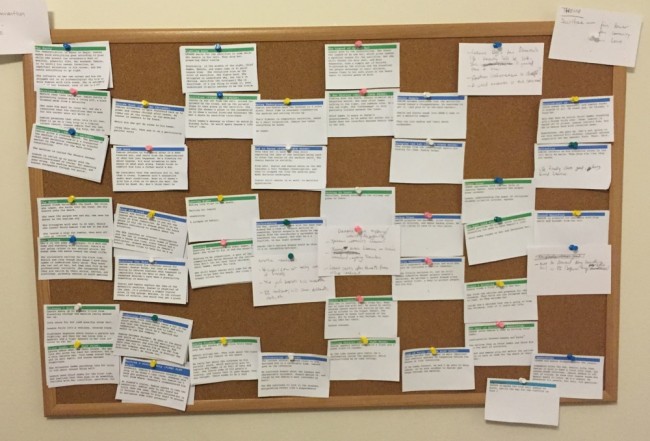
I used this process when I was rewriting my novel The Auriga Project. Here’s what my story looks like on a corkboard:
One note of warning: if your description within the body of the index card in Scrivener is too long, the text will overflow to multiple cards when you print it out. If that happens, pare back your description or simply stack the cards after you cut them out.
Corkboard Settings
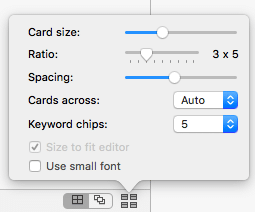
This is a good time to point out some corkboard settings. Using the buttons in the bottom right of the interface, you can change the size, ratio, spacing, and arrangement (snap to grid or free-form) of your corkboard.
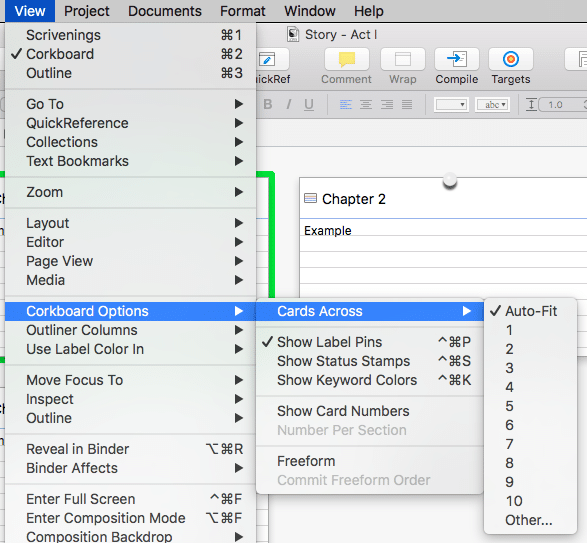
Using the corkboard options in the view menu, you can auto-number the cards (I'm a big fan of that one, as I rearrange scenes and chapters frequently) and other options.
Finally, it's worth pointing out that the colors in the photo of my physical corkboard in the previous section came through because of the labels I applied to my index cards. I created custom labels for each point-of-view character (blue for the male lead, green for the female lead). This comes through when you print them out, which has a nice visual effect.
4 Storyboarding Questions
Now that you can see your story as a whole in a physical medium, rearrange it and move things around. Don't be afraid to mess it up, because your work is already saved in Scrivener at the point you printed it out. I find that seeing my story in a physical medium will reveal flaws I missed or couldn't see on a smaller computer screen.
Here are a few points to pay attention to at this point.
- Does each scene have a purpose? If you remove a scene from your storyboard, what happens to your story? Make sure each scene contributes to the story in a meaningful way by revealing a new piece of information, developing your characters, bringing your protagonist closer to (or farther from, depending on your end game) their goal. Or all of the above.
- Does your plot have continually rising action? Your story should have consistently rising action so that the plot never goes slack or bores the reader. Read more about rising action.
- Is there a consistent timeline? Make sure that your timelines all match up, especially if you have multiple point of view characters.
- Have you hit all the important plot points? You need an inciting incident, several scenes with rising action, a first plot point/doorway of no return, a second plot point/doorway of no return, a climax, and a resolution. Refer to the blog on plot and structure if any of these terms are unfamiliar to you.
If you look closely at the photograph of my corkboard for The Auriga Project above, you'll notice a couple edits I made at this phase in the process. Can you spot them? I added three scenes (and removed a few others). Don't take this step for granted!
Then, Make Changes in Scrivener
Once you’ve rearranged your story physically and you are happy with it, copy any changes you made back into Scrivener.
Sorry, I know this part is tedious, but keep in mind that all this work will make your story stronger—and make it easier for you to write (or rewrite!) when you are done.
Finally, Start Writing Your First Draft!
Finally, you’re ready to start drafting. If you used this storyboarding process to outline a story you haven’t yet written, here’s what you do: copy your storyboard into the Manuscript folder of the binder. If you haven’t already done so, arrange the scenes into chapter containers.
Since you worked so hard to break the story out into it’s basic units, you can then simply open the first scene and start typing. The description you wrote on the front of the index cards appears in the Synopsis (top of the Notes) pane in the Inspector, which makes it easy to reference while you're drafting.
If any of those pieces of the interface are unfamiliar to you, please refer to “A Walk Through Scrivener's User Interface.”
More Scrivener Help
In my next article, I’ll go over how to effectively write rough drafts in Scrivener by utilizing all of the tools it provides such as word count targets and deadlines.
The reason I have you copy and paste the outline you made instead of dragging it over is because your story is going to continue to evolve as you write it, and it’s educational to compare the story you actually end up with to the storyboard you prepared.
If, however, you used storyboarding to help you get unstuck or to revise your story at the end of a draft, you’ll have to update your manuscript folder to match your new outline. That means deleting scenes, moving scenes around, rearranging chapters, etc. Again, keep a copy of your storyboard for comparison later.
I’ll give you a safe way to revise your manuscript that ensures you don’t lose anything you’ve written in a future article. In the meantime, good luck storyboarding and let me know in the comments if you have any trouble or have additional questions about Scrivener's corkboard or my storyboarding process. It is by no means the only way to work it, but I've found it to be very effective for my own work.
Do you enjoy the storyboarding process? Have you tried it in Scrivener? Let us know in the comments.
PRACTICE
Come up with a short story idea and practice storyboarding on a small scale:
- Start by creating “beginning,” “middle,” and “end” cards.
- Then, break these cards into individual scenes.
- Make sure each scene contributes in a meaningful way to the story and that the action is continually rising to a climax.
- Don’t forget the resolution!
Mastering the process with short stories will give you essential practice for when you’re ready to tackle a longer (epic?) novel-length work.
When your simple storyboard is finished, print it out and share it with a friend. And please let us know how your storyboarding process went in the comments section!
Matt Herron is the author of Scrivener Superpowers: How to Use Cutting-Edge Software to Energize Your Creative Writing Practice. He has a degree in English Literature, a dog named Elsa, and an adrenaline addiction sated by rock climbing and travel. The best way to get in touch with him is on Twitter @mgherron.


Can my WORD documents be imported into Scrivener and then manipulated with it’s various functions?
I only ask because everything I have written is in WORD.
Thanks.
Hi David! Yes, they absolutely can. If you can’t stomach a copy/paste session, first insert a unique section separator in your word files (i.e. type ### between each chapter in the Word file you want to import). Then in Scrivener go to File -> Import -> Import and Split… select the Word document you want to import, and then type your unique section separator in the box below the file chooser.
That will at least get your content into Scrivener and break it out by section. Let me know if it worked for you.
I’d add that it also IMPORTS/SPLITS from FINAL DRAFT
As a former computing tutor and devout Luddite, I use real index cards. I always prefer the simplest options.
I have tried Scrivener and don’t like it. Like most computer applications, I find it too distracting, and it saps my creativity.
I hand write then transcribe into the PC.
Pens and typewriters rule!
Brilliant idea – thanks Matt! I’m going to bookmark this and try it out this week.
Can’t wait to see what you come up with!
I have a hard time seeing how Scrivener leverages either organization or productivity for a writer. It seems like some evil software engineer was allowed to run amuck with useless options and unneeded features (software engineers call this “powerful” while actual users call it “unnecessarily complicated.” What I see is a word software program where the designers were not writers, nor did they seem to have much of an idea of real writing process and or what writers want – time and effort saving devices in organization, rearranging, changes, tracking specifics, while keeping the processes straight forward, intuitive and obvious. Having tried to use Scrivener and found its learning curve far to expensive in my time, the only thing that I see in Scrivener has that is superior to Word – is the compiler. I was totally unimpressed with the storyboard concept where you have to print them out and manually cut and past to organize them. That is enough in and of itself to send me else where.
Nobody said you HAVE to use the cork board. I don’t. Scrivener is really a bunch of note cards. You can create/edit/arrange/nest them anyway desired. Each note card just happens to contain a nice word processor and clicking on a parent “folder” renders all the content on your screen.
I took my editor’s three pages of notes, split them into individial TODO cards, and cross keep them to the corresponding scene. Quite handy.
I really found the built in tutorial (which only cost me an hour) most illuminating about options. Don’t have to use one particular workflow to derive value.